How to Delete Music from Twitch VODs: Protect Your Streams from Copyright
Introduction:
Are you a Twitch streamer looking to take control of your VODs and ensure they are free from copyrighted music? Removing music from Twitch VODs is essential for compliance with copyright regulations and protecting your content. With the right tools and techniques, you can seamlessly remove any background music from your VODs, preserving the integrity of your streams and avoiding potential copyright strikes.
Can You Delete Music from Twitch VODs?
Yes, as a Twitch streamer, you have the ability to delete music from your Twitch VODs. Twitch provides tools and options to manage your videos, including the ability to delete or edit VODs.
Warning: Removing Copyrighted Music from VODs Doesn't Protect You from Live Strikes
While it's essential to remove copyrighted music from your VODs to avoid potential issues, it's crucial to understand that this step alone does not guarantee protection against live copyright strikes during your streams.
To remove background music from video online free on Twitch, you can access the Audio Mixer on Twitch and enable the option to exclude audio resources from clips and VODs. This helps ensure compliance with copyright laws and allows you to maintain control over the content on your Twitch channel.
But enabling app-specific audio sources on Twitch activates the "Secondary Audio Track," which utilizes roughly 160Kbps of additional bandwidth. Are there other less resource-intensive ways?
Other Methods for Erasing Music from Twitch VODs
Of course, there are other music removers from videos to do this. Now, let's explore the different methods available to erase music from Twitch VODs. These methods provide various options to exclude copyrighted music or unwanted audio from your recorded content.
Using OBS Studio
OBS is a free and open-source video recorder and live streamer. With real-time video/audio capturing and mixing, OBS lets you create dynamic scenes using multiple sources like windows, images, text, and webcams.
Get Rid of Music from Twitch VODs Using OBS
Step 1: Open the GoXLR, go to "ROUTING," and uncheck music from the "Stream Mix" row.
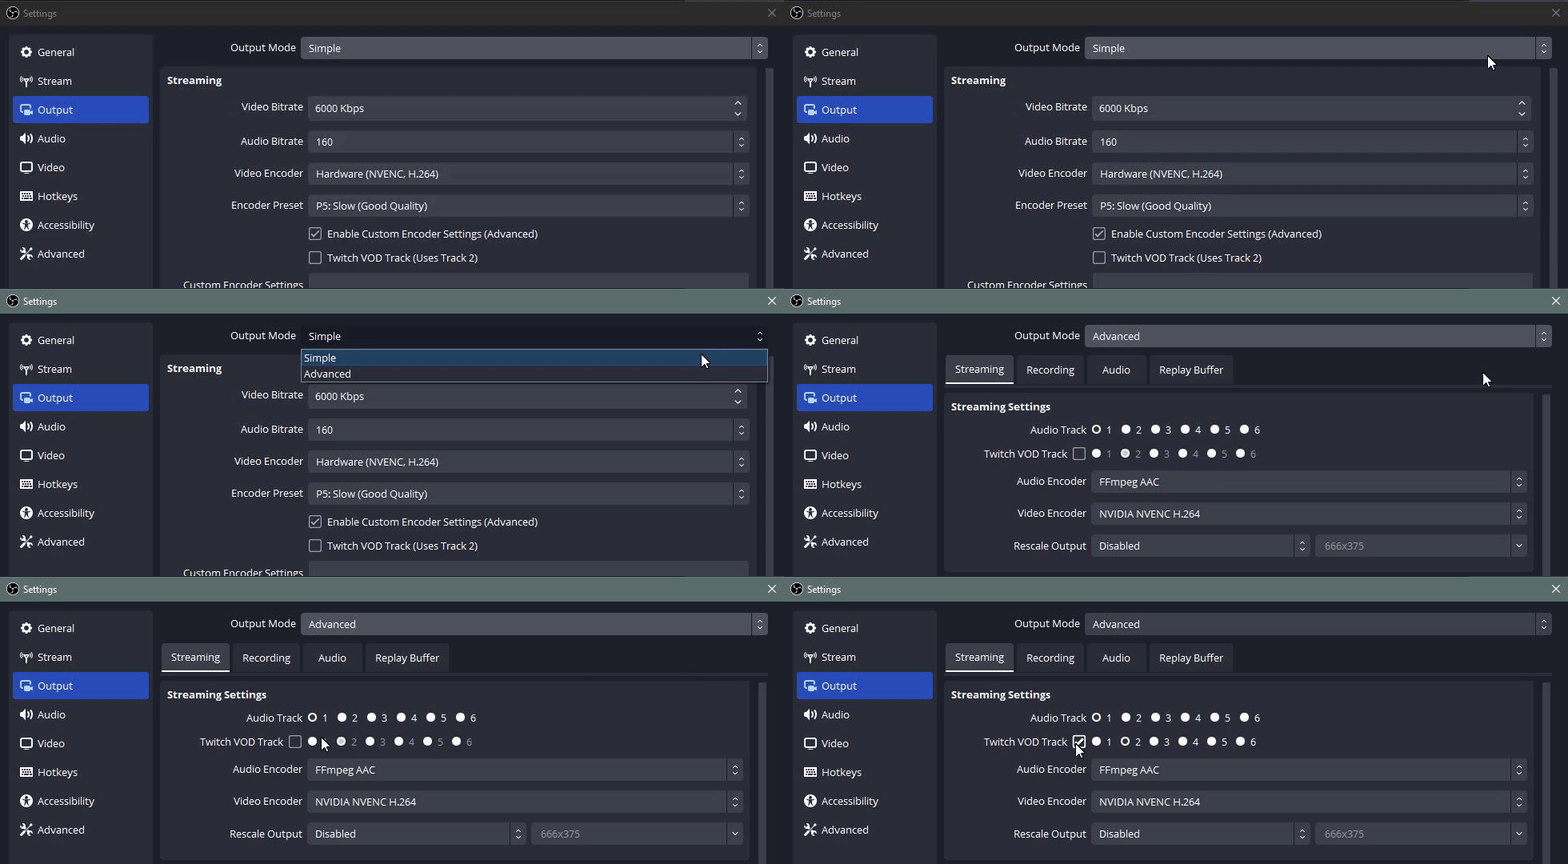
Step 2: In the OBS Studio, navigate to "File" > "Settings" > "Output."
Step 3: Set the output mode as "Advanced Mode," check "Twitch VOD Track," and select a channel number different from the audio track.
Step 4: Click on the "+" > "Audio Input Capture" > select "Music (4- TC-Helicon GoXLR)" from the "Device" drop-down.
Step 5: Click on the cogwheel at the right of the music channel and choose "Advanced Audio Properties."
Step 6: Uncheck the number you set earlier for the Twitch VOD track in the "Music" panel. Click "Close."
Using Streamlabs
Streamlabs provides free software for video recording and live streaming on different platforms like Twitch and YouTube featuring widgets, overlay themes, alerts, tip pages, and Cloudbot moderation tools. It is freely available on macOS and Windows. Its Streamlabs Desktop is a fork of OBS Studio.
Eliminate Music from Twitch VODs Using Streamlabs
Step 1: Open Streamlabs OBS and go to the "Advanced Audio Settings."
Step 2: Uncheck the part you don't want so it is not green next to the "music" section.
Step 3: Then go to "Settings" > "Output."
Step 4: Under the "Output Mode," set it as "Advanced Mode."
Step 5: Click on "Twitch VOD," and put 6 (differ from audio track) in the "Twitch VOD Track" field.
Step 6: Click "Done."
Using Built-in Audio Mixer
Twitch has a new Advanced Audio Mixer feature that allows you to manage your audio sources on a per-app basis. To use this feature, you need to install it beforehand and put your stream offline.
#1 Download the Advanced Audio Mixer
Step 1: Open Twitch, find the Settings icon at the bottom right and go to the "Audio Settings" page.
Step 2: Click "Install" at the top and click "Proceed."
Step 3: Wait for it to install, which may take a minute, and you'll receive a notification once it has been successfully installed.
#2 Exclude Music from Twitch VODs Using Audio Mixer
Step 1: In Twitch, go to the general audio settings and find the "Audio" panel. Then enable "Exclude this source from Clips & VODs."
Step 2: The "Secondary Audio Track" will be enabled automatically, which uses around 160Kbps of additional bandwidth.
Step 3: You will see a "no" icon in the audio mixer, with a tooltip confirming its successful exclusion.
Voicemeeter Banana
Step 1: Install Voicemeeter Banana
First, download and install the free 'Voicemeeter Banana' software on your computer. This software will allow you to manage audio sources separately.
Step 2: Configure Voicemeeter Banana
Open 'Voicemeeter Banana' and navigate to the 'Virtual Inputs' section.
Ensure that 'A1' and 'B1' are highlighted under 'Voicemeeter VAIO.'
Make sure that only 'A1' is selected for your audio output.
Step 3: Adjust Windows Sound Settings
Go to your Windows Sound Settings by right-clicking the speaker icon in the taskbar and selecting "Open Sound settings."
In the Sound settings, under the "Output" section, select 'VoiceMeeter Input VAIO' as your output device.
Step 4: Set Music Software Output
In your music software (e.g., your music player or streaming application), navigate to 'App volume and device preferences' in your Windows Sound Settings.
Set your music software's output to 'VoiceMeeter AUX Input.' This will direct your music's audio to the appropriate channel in Voicemeeter.
Step 5: Configure OBS Studio
Open OBS Studio and create two new Audio Output Capture sources.
Name the first one 'Music' and set the source Device to 'VoiceMeeter AUX Input.' This will capture the separated music audio.
Name the second one 'Game Audio' and set the source Device to 'VoiceMeeter Input.' This will capture the game sound.
Right-click on the Audio Mixer panel within OBS and select 'Advanced Audio Properties.'
In the Advanced Audio Properties panel, make sure to uncheck every box next to 'Music' except for the first one. This ensures that only the music audio is captured.
Now it’s time to activate Twitch Vod Track. Inside OBS go to ‘Settings’ then ‘Output.’ Inside the window tick the ‘Enable Advanced Encoder Settings’ then tick the ‘Twitch Vod Track’ box.
Closing:
There you have it! With these methods, you can regain control over your Twitch VODs and ensure they're free from unwanted music or copyrighted content. Whether you choose OBS Studio, Streamlabs, Twitch's built-in Audio Mixer, or Voicemeeter Banana, you have the power to customize your VODs and protect your streams from potential copyright issues. Keep your content safe and entertaining for your viewers while staying compliant with copyright regulations. Happy streaming!